Articles
Raising Seedlings
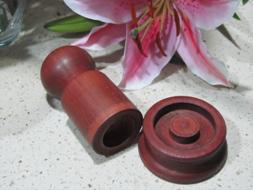
At last years December meeting I was fortunate to select a wooden 'Pot Maker' when my number was called in the raffle. Up until this stage of my life I had propagated seedlings either in the garden bed, in a polystyrene box or in cardboard tubes in mini green houses. Now my main method when not planting directly into the garden bed is in paper pots, made with the 'Pot Maker' in mini green houses. Even without a 'Pot Maker' it is easy to make paper pots.
To use the 'Pot Maker' I cut strips of newspaper 80mm X 30mm, originally I was doing them twice as long but found the pots were too thick. I wrap it around the bottom of the barrel section of the 'Pot Maker' and fold in the bottom section. then I press the barrel section firmly into the base piece to form the pot. Don't wrap it around the barrel too tightly or it may be difficult to remove when done.
If you do not have a 'Pot Maker' don't despair you can use a spice bottle or a small tin (I get tomato paste in mine). Cut the paper the same size as above, roll it around the container with about 20mm overlap at the bottom, fold this under the container, crease well around the edges. Remove from the container, sit on table/bench and fold down the edges around the top to strengthen a bit. Once again don't wrap it around the container too tightly or it may be difficult to remove when done. (I find these pots are ideal when I only want to propagate a small number of a particular plant e.g. I only ever need 2 capsicum plants at a time or 1 eggplant bush at a time.)
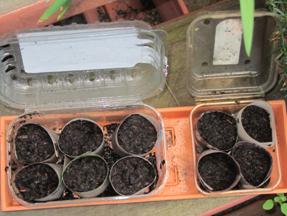
To use my paper pots I place them in mini green houses. Mini greenhouses are recycled clear plastic containers with hinged lids which you commonly see filled with strawberries, cherry tomatoes, kiwi fruit, salad mixes, cakes, biscuits, etc. Before using the plastic containers make sure there are some drainage holes in the bottom and a few breather holes in the top (otherwise you will drown or cook your seeds/seedlings, and I speak from experience). Partially fill paper pots with seed raising mixture, your own or a commercial mix (I made a paper funnel to help get the soil in the right place). Then place the seed or seeds on the soil surface and cover with enough seed raising mixture for the size of the seed. (Rule of thumb – cover seed with as much seed raising mixture as twice the circumference of the seed.). I water them well with a spray bottle filled with water and Epson Salts (1 teaspoon Epson salts to 5 litres water) ensuring they are well dampened. If I'm planting seeds that need to be soaked before planting I always dissolve a small pinch of Epsom salts in the water. Close the lid of the container and place in a warm, sunny position but be wary on really hot days when they will do better in dappled light.

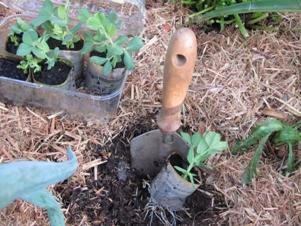
Make sure the soil is kept damp. When seeds germinate and start to grow open the top of the container a little to allow better air flow and as they grow taller open completely. When it comes time to plant out the seedling, I soak the paper pot in seaweed solution for a few minutes then I rip/remove the base of the paper pot and place in the prepared hole in the garden. The outside of the pot soon breaks down and I haven't disturbed the roots of my seedling. I usually water in with some seaweed spray and a little molasses.
Some advantages of this method are
- · plant as few or as many seeds as you need (in small gardens and for small families we often only need two or four plants of a particular type)
- · plant out seedlings with very little root disturbance
- · in cooler areas plant seeds in a protected environment a couple of weeks before the weather starts to warm
- · the clear plastic lets you see what is happening as the seedlings grow
- · easy to transport to planting out location
- · controlled environment
- · use only small quantities of seed raising mixture
- · easy to open and close
- · you are recycling
- · good for children to handle and watch seeds grow
- · protects from pets in the early stages
You can make larger paper pots to start cuttings. Wine bottles are good for this, the concave base of the bottle allows you to shape your pots the same way. For larger pots allow enough paper length to wrap around at least 3 times and allow enough height to fold the top a couple of times to stabilise the pot. Go ahead and experiment.
Nature makes seeds with enough nutrients to feed themselves until they have germinated and produced their first leaves, after this you will need to feed them. Seed raising mixes do not have nutrient added for this purpose, their purpose being to support the emerging plant and to deliver moisture. Once the seedling has its first proper leaves transplant into a garden bed or pot with potting mix.
You can make your own seed raising mixture
- · 1 part sphagnum peat moss (or coir peat)
- · 1 part perlite
- · 1 part vermiculite
You can make a basic potting mix
- · 3 parts coir peat
- · 3 parts compost
- · 1 part vermiculite
(I add in some blood and bone, dolomite, aged manure - sheep, chicken, cow)